(Lima) Beans and Delhi Cha(a)t

Saturday, March 25, 2006

Weekend Herb Blogging: Red Beet

I am returning to Weekend Herb Blogging (WHB), hosted by Kalyn of Kalyn'’s Kitchen, after a long while. This is one event I always feel glad to attend, and even when I can'’t participate, I make sure to read the entries that come in week after week. Thanks to Kalyn for creating a platform that helps us get acquainted with an amazing array of fruits, vegetables and herbs from across the globe.

My entry for this week is the red delight called beet. While researching for my post, I came across some wonderful facts about this root. In ancient times, Romans used it to cure fever and constipation, besides other diseases. Hippocrates, the father of medicine, advocated the use of beet leaves as a binding for wounds.


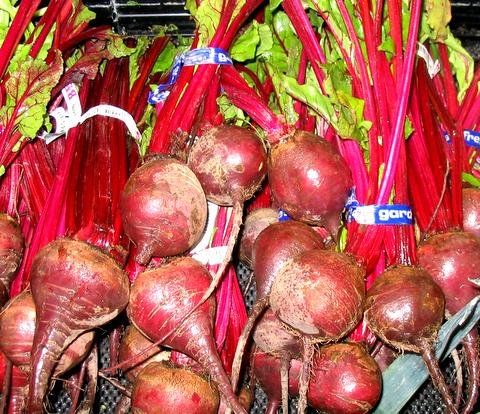
Among the sweetest of vegetables, beetroot has considerable amounts of Vitamin C in the root area, while the upper portion contains a good amount of Vitamin A. The health benefits of beet include protection against heart disease, congenital defects and certain types of cancer, mainly colon cancer. More information on this power-packed root can be found here.

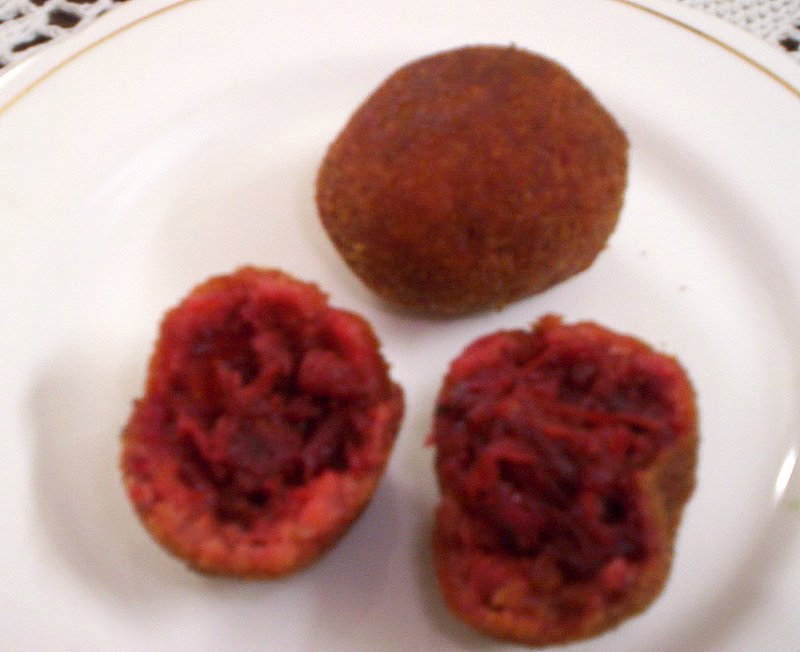
My recipe using beetroot is a yummy snack called beet chops. This is similar to fish chop I blogged about earlier, except for the stuffing, which, as you can guess, is made of beet. Well, that'’s the main ingredient. I also used some carrots in my recipe. This is a popular snack item of Bengali cuisine and tastes delish. Let'’s get down to it then?


Beet Chop:

Ingredients:

Beet: 2-3 big, grated
Carrot: 2 big, grated
Bay leaves: 2
Tomato: 2, pureed
Garam masala powder (Dry grounded cardamom, cloves and cinnamon): ½ tsp
Cumin seeds: ½ tsp
Ghee (clarified butter): 1 tsp
Raisins, cashew nuts
Salt to taste
Oil for frying
And a paste of:
2 onions
1 inch ginger block
6-8 garlic cloves

For outer cover:
Potatoes: 4-5 big, boiled, mashed
Bread slices: 3-4
Egg: 1
Bread crumbs
Salt, pepper

Method:

The Stuffing:


1. Heat oil in a wok and add the cumin seeds and bay leaves.
2. Add the onion-ginger-garlic paste and garam masala powder. Stir a bit.
3. When the masala starts drying, add the grated beet and carrot. Stir well. Add salt.
4. Lower heat, cover and cook for 15-20 minutes or until the water starts drying.
5. Remove cover, stir constantly, and add the ghee. Let the mix dry completely.
6. Add the raisins and cashew nuts and mix well.

Your stuffing is ready. Remove from heat and let it cool.


Making the Chop:


1. Mix the mashed potatoes, bread slices, salt and pepper. Add an egg and bind into a dough.
2. Take a roundel of the dough and make a cavity.
3. Fill the cavity with the stuffing and seal the edges.
4. Shape into a chop (we made round ones; you can give it an oval shape too, or make it flatter, if you like).
5. Roll the chop over bread crumbs and deep fry them in batches.
6. Serve hot with onion rings and tomatoes or sauces/chutneys of your choice.


The chop is extremely delicious what with the soft and sweet texture of the beet alongside the savoury taste of potato, bread and salt. It'’s one of my favourite snacks, and I hope you will savour it too. Enjoy!

Sury

Tuesday, March 21, 2006

Weekend with Prawns

Yes, yes, I know it’s Tuesday. But for a seasoned procrastinator like me, posting a weekend report two days later is most expected (insert blush icon here). However, when the report itself is tasty, we can afford to overlook the details, can’t we?

So last weekend saw me working with prawns in the kitchen. For two completely different end products belonging to different cuisines. The first was Fettuccine pasta with prawns and a simple olive oil sauce. The credit for this one goes to Cesar. In fact, I should give him the credit for introducing me to pasta in the first place. In cooking terms that is. I had tasted pasta in restaurants on a few occasions, but making it at home looked like a distant possibility. Until Cesar came along to share some of his home-grown expertise that is.

Anyhow, getting back to the weekend track, this easy-to-make pasta dish tastes surprisingly nice and is amongst the healthiest. Although I did make a few changes to suit my convenience, the essence of it was retained because of the main ingredient; you guessed it right—prawn. Let me share the original recipe with you first.

Shrimp Fettuccine:


Ingredients:


4 tablespoons olive oil
2 tbsp. choped parsley
1 teaspoon grated lemon skin
1/2 kg fettuccine
3 minced garlic cloves
1/4 cup white wine
Salt & pepper
1/2 kg shrimp

Method:

1. In a bowl mix two tbsp oil with parsley, lemon skin, salt & pepper.
2. Boil the fettuccine (in water with salt) and cook till al dente.
3. Join the pasta with the sauce from step 1 and put aside
4. In high temperature, heat up the rest of the oil and fry the shrimps for a minute. Then add garlic and heat for another minute.
5. Add white wine and cook, always stirring, for another 40 secs
6. Pour this on the fettuccine (put aside on step 3), mix well and serve immediately.

Cesar’s Tips:

• If you want a stronger flavor, you can add some basil leaves (no stems) during the final seconds of cooking the shrimp. Mix with the pasta and serve.
• For a better flavor, you can use freshly-crushed pepper.


My tweaks:

I used bigger-sized prawns, cut into smaller pieces. I also replaced parsley with fresh mint and coriander leaves. The taste was superb! And finally, I used vinegar in place of white wine. The last tweak is probably a travesty of the original recipe, but I didn’t want the non-availability of white wine to be a reason for staying away from relishing this dish indefinitely.

The end result was yummy to say the least. This is easily going to rate as one of my favourite pasta recipes. So do give it a try!

The other prawn delight I cooked over the weekend was Prawns Jalfrezi. I have been meaning to make this ever since I saw this post on VKN’s blog. I followed his instructions diligently, barring the addition of soya sauce. As reliable as VKN’s recipes are, this one was a hit at our home. Thanks, VKN!


I sure look forward to many more such delicious weekends. Don’t you? :P

Sury

Thursday, March 16, 2006

Springtime Riot aka Holi

Image courtesy: www.dialindia.com

If you are born in India and grow up here, you inevitably have a tough yet fun time keeping pace with festivals. There’s a saying in Bengali, “Baro mashe taro parban,” which literally translates to “Thirteen festivals in twelve months.” It’s a figurative way to say there are more festivals in this land than there are months in the calendar or seasons in the air.

And one of the wildest and most loved Indian festivals is Holi, which ushers in the spring season. If you didn’t know already, the highlight of this festival is colours. Colours that follow no disciplinary limits, no aesthetic codes, no regional, caste, class or religious barriers. Colours that you get smeared with wildly, whether or not you enjoy being splashed so. For on this one day, everything is allowed. And just in case you twitched your eyebrows to express resentment at such ribald behaviour, you will get a fresh dose of smearing with the slogan “bura na mano, holi hai!” (Don’t mind, it’s holi.) Traditionally, the festival is celebrated on the day after the full moon in March every year.

The Folklore:


Like most Indian festivals, Holi has its own set of legends, and traditions born out of these are followed to this day. Of the many holi stories, two are most popular.

The first one surrounds the myth of the demon king Hiranyakashyap and his son Prahlad. According to the legend, the demon king had commanded all his subjects to worship him and no one else. However, his own son, Parhlad defied him and turned an ardent devotee of Lord Vishnu (the sustainer in the Hindu trinity).

Unable to make his son follow his diktat, Hiranyakashyap made repeated attempts to kill Prahlad. When none of them worked, he turned to his sister Holika. She had been blessed with a boon that made her body immune to fire. So the ploy hatched by the demon king and his sister saw Holika entering a burning pyre with Prahlad on her lap.

However, what Holika overlooked in her attempt to kill her nephew was that the boon worked only when she entered fire alone, not with someone. Prahlad on the other hand, kept chanting Vishnu’s name as the flames raged on. In the end, Holika was burnt to ashes while Prahlad came out unscathed.

To this day, effigies of Holika are burned to symbolize the victory of good over evil. Huge bonfires are lit and in some regions of India, people even offer harvest produce to the fire.


The second folklore revolves around the eternal romance of Lord Krishna and his beloved Radha. As a child, Krishna was known for his mischief. One day, he went to his mother Yashoda and complained how nature had been unfair in making him dark and Radha so fair. To humour the young Krishna, Yashoda told him to go and smear Radha’s face with colour. And so, armed with the license of motherly lenience, Krishna promptly went and applied colour on Radha’s face so as to make her like himself. Krishna’s prank of splashing Radha and her girlfriends with pichkaris (water jets) caught on the fancy of local people and is now a full-fledged Holi tradition. Children are particularly fond of the pichkaris and they come in every shape and colour.

Image courtesy: www.masters-gallery.com

The Frolick:


My earliest memories of Holi are filling up balloons with coloured water and hurling them at my friends. Being a dimwit, I was the one who came drenched after the play. As for my water balloons, well, my missiles almost always missed the mark and left potential victims unblemished. Sigh. This unfair victimization could be one reason, I started disliking Holi as I grew up. One particular year took my distaste to a new height. That year we went to one of our relatives houses to play Holi. Along with colours, dry and wet, they smeared a weird concoction all over my head—colours mixed with anti-lice oil! As someone who has long hair that takes ages to be rid of colour, I can tell you, that wasn’t nice. Not nice at all.

As un-holi as I have grown up to be (I usually keep in hiding inside my room, to the best of my ability), it amuses me no end to see my brother on Holi every year. He loves playing it with his equally wild friends. He would typically leave the house in the morning donning a spotless white t-shirt. By evening, when he makes a return, you won’t recognize him, for he turns into a ghostly spectacle. The spotless white gets transformed into a multicoloured, disfigured, beyond-abstract piece of art.


The Food:

Holi is big in North India. It’s one of the two biggest festivals in fact (the other one is Diwali). Suffices to say, food forms an important part of the festivities. Traditionally, bhang an intoxicating herb, extracted from the leaves and buds of cannabis, takes the lead in edible preparations. It is consumed in different ways, all equally potent—in a milky-nutty drink called thandai, fried into fritters, and made into chewy little balls called golees.

Other traditional Holi foods include puran poli (sweet stuffed pancake), kanji ke vade (lentil patties), gujia (sweet stuffed pastries), and malpua (fried pancakes dipped into sugar syrup).

I cooked a rare non-veg dish that manages to sneak into the above list. It was easy to make and tasted rather nice too.

Meat Kofta Curry:


Ingredients:


For kofta or meatballs:


Minced Mutton: 400 gms
Ginger-garlic paste: 1 tsp
Coriander leaves: 1 tsp (finely chopped)
Mint leaves: ½ tsp (finely chopped)
Garam Masala: ½ tsp
Black pepper powder: ½ tsp
Salt

For Curry:

Onions: 2, chopped
Bay leaves: 2
Ginger-garlic paste: 1 tsp
Tomato puree: 1 tbsp
Turmeric: A pinch
Garam masala: ½ tsp
Salt

Method:

1. Mix the minced meat with the other ingredients for the kofta and keep aside.
2. Heat oil in a wok and fry the onions till light brown.
3. Add the bay leaves, ginger-garlic paste, tomato puree, turmeric and salt. Fry well.
4. Add two glasses of water (or less if you want a thicker gravy) to the wok and bring it to a boil.
5. Make balls out of the minced meat mixture and start dropping them into the gravy.
6. Turn the flame low, cover and allow cooking until the koftas are done.
7. Add a pinch of garam masala just before removing from heat.
8. Serve with hot plain rice or chapatti/parantha.


This was reasonably easy to make and tasted rather nice. I will be making it more often. I hope you do too :)

Sury

Wednesday, March 15, 2006

HOLI Hai!


We wish all our readers a fun-filled and vibrant Holi! Splash!!!

Wednesday, March 08, 2006

Chicken Aji

Hello to all our fellow bloggers/readers!

It's been a while since Sury and I posted something. A number of things showed up for both of us, none of them bad. Quite the contrary, some happy events but very demanding and time consuming. However here we are, back to the kitchen with a glimpse at our faraway (but not for that distant) cultures.

This time, in bringing you a variation of yet another typical dish from my city Lima. This one is a favorite and a key piece in Criollan Food. It's name is Ají de Gallina, which could translate to Chicken Ají.

The history of Ají de Gallina could be traced back to the French Revolution (1789) which brought in Europe the bloom of new forms of politics, economics and, of course, traditions; new ways of thinking, new spiritual tendencias and certainly new cooking. Many of the noblemen's cooks lost their jobs after the Revolution and so decided to travel to the New World, bringing to this side of the world new recipes and techniques. These cooks were hired by the Criollan class as a way of demonstrating their wealth to the Spanish.

One of these techniques consisted in the "shredding" of meats (before that meat was usually served in large pieces, something which dated back to Inca times). Hen went through this process and served in a different way which included a concoction of chopped almonds, nuts and water that was mixed with these hen threads and later cooked with a sauce of garlic, pepper and onions. These would be the early beginings of our Ají de Gallina.

Ají de Gallina consists of creating a sort of spicy paste. White bread (the kind you make toast with) soaked in milk is what gives the paste it's thickness and texture. Ají is later added to become the key flavor ingredient. On the other side you have a boiled chicken breast (this dish uses only the breast) which you later have to "shred", that is you start pulling thin threads with your hand, bit by bit until you end up with a plate of chicken threads. Ají de Gallina is usually served over a bed of potatos, with rice on the side and decorated with hard-boiled egg wedges and a black olive.

The recipe I'm bringing today is a variation (one of many). It includes pecans for a slighter sweeter, more present, flavor.

So here we go:


Ingredients (for 4):

3 slices of white bread
3/4 cup milk
1 chicken breast
2 sticks of celery
1 laurel leaf
3 tbsp. vegetable oil
1 tbsp. minced garlic
1 chopped onion
5 tbsp. minced Green Ají
1/2 cup grated parmesan cheese
5 tbsp. chopped pecans
4 cooked yellow potatoes*
2 hard-boiled eggs
4 black olives
1 tbsp. chopped parsley
salt & pepper

* A whole chapter (a whole book actually) could be written about potatoes in Peru. Potatoes were one of our biggest contribution to the world and the available varieties are endless. It might be really difficult to get yellow potatoes, I guess you can try to find them, we've been exporting after all. If not you can use another type.


Preparation:

1. Soak the bread in the milk for a few hours (all morning) then blend (with a blender, if possible).
2. Cook the chicken breast by boiling it in water with the celery sticks, laurel leaf, and salt.
3. Let the chicken cool down inside it's broth. When it's cold, shred it by pulling thin threads until all the breast is shredded. Keep the broth!
4. Heat the oil in a skillet and add the minced garlic and onion.
5. After 5 minutes add ají.
6. Cook for 2 more minutes and add the blended bread. Add salt and pepper.
7. Little by little, pour one cup of broth you saved. If you notice the mix too thick, add more broth. Cook for a few minutes, always stirring.
8. Add the chicken threads, parmesan and pecans. Take out of the heat for a while so the ingredients can integrate themselves.
9. Serve over potato slices. Decorate with hard-boiled egg wedges and olives.
10. You can sprinkle some chopped parsley on top.


Try it and let us know how it went :)

Next time I will talk a bit more about potatoes and bring another key dish in Criollan Food: Papa a la huancaína.

Enjoy!

Cesar